Tuesday, December 8, 2015

carry.on.your.keep.calm

Do feel like the quote "Keep Calm & Carry On" was created for you!? I'm sure we all do at some point.

Life has its ways of getting our undies in a wad and sometimes you feel like there's no way to pull that wedgie out! Well no matter what has you frazzled I assure you I have an essential oil blend that can help! And you can keep this in your pocket, your purse, your drawer at work, home wherever is handy for you!

Mix equal parts of Serenity "Calming Blend" and Balance "Grounding Blend." Serenity for calming emotions, lessening tension, promoting relaxation. Balance for whole-body relaxation, and feelings of tranquility.

Contact me if you need help finding these essential oils, if you need more information on this blend, or if you have more questions about essential oils.

Find me on Instagram #SheKnowsOils.


sleep.tight

Sleep is vital to health. I know there are many people who struggle with sleep from all different aspects. Some have difficulty falling asleep, some have difficulty staying asleep, and some have difficulty just getting restful sleep. 

Today I want to offer an essential oil blend that is generalized. It will allow you more sleep despite what's preventing you from getting the amount of sleep you need (other than time, I can't control that).

Cedarwood relaxes the mind and body. Lavender is for a relaxing, peaceful sleep. Vetiver for calming and grounding effect.

Are you armed to take care of yourself and your family? Do you have the oils and other products you need to get the rest you desire? Contact me and I can help. I love helping people achieve goals they've been struggling with , or have almost given up on.

Find me on Instagram #SheKnowsOils.


focus.is.necessary

This is probably my favorite blend of all time [at least for now].

I work night shift, and even though I have been doing the same shift for the last 8 years, I still struggle to stay awake. Not only that, when we have meetings and classes during the day, I have trouble with my mind wondering, because I'm thinking of all the things I'd rather be doing, or how I feel I could be spending my time more wisely.

So today I want to share with you my favorite blend of essential oils that helps keep me focused.

Peppermint & Wild Orange provide the focusing, energizing, and revitalizing you seek. Frankincense enhances the benefits of the Peppermint and Wild Orange. Making this a perfect blend to keep on hand. This is a safe blend to use on your kiddos too!

Contact me if need more information, or you need help finding 100% pure essential oils to use on yourself and your family.


Find me on Instagram #SheKnowsOils.

Friday, April 5, 2013

spring.craftiness

Someone's been feeling a little crafty!

A few weeks ago, a friend from work, and I got together and made Spring/Easter wreaths. They turned out so perfect!! Can't get enough of mine. My mama happened to come by my house and said, "this is one of the best & most beautiful things you have made so far!" I can't agree better!


A little later that week I made these adorable burpcloths! Ahh I can't get over their cuteness! I was able to make four out of the fabric I bought. So two will go to Tish, a girl I work with who just went out on maternity leave...I had wanted to make her something handmade for her baby shower but ran out of time & had to buy some store bought things, but now that I have these she'll be getting them in the mail soon for her & miss Avery! The other two will go to my sister-in-law.


Last week I tackled a little baby romper that will also be going to my sister-in-law & her baby on the way, Briella. I love it so much I don't want to give it away. But at the moment I have no use for it, so no since in keeping it. But I will be letting her know that I will be expecting it to be taken well care of, and wanting it back when I have a little girl! Spent too much time & energy on this little thing!! Not to mention this is the first piece of clothing I have made by myself! I found a free tutorial, and made a few adjustments. [Tutorial ]


Of course after I made her the cute romper I couldn't stop there. So I grabbed some onsies and sweetened them up with various designs.  I took hold of the whole ruffle bum; they're just so cute! I added a flower, an applique, a bow (Lilly's idea), and added a skirt to make a dress!


After all that I thought I was done....but I saw the cutest little halter and just had to make it. It's an apron halter, that is worn as such: place the top & straps under the babies armpits, in back criss-cross straps, bring over shoulders, pass through button hole in front and tie a cute bow! I ended up making mine slightly smaller than the tutorial I saw since her baby will be in the summer time around 3 months instead of 6 months. [ Tutorial ]


So now after all that you would think I would take a break....

I've been trying so hard to have at least one room in the house completed. Lilly's room is the closest to being at that point. So I've been finishing up a few things she still needed to complete her room. Pictures & Curtains.


Her room still isn't quite completely finished, but these are getting it there. We have her a night stand that needs cleaning and a touch-up painting, we're going to paint a tree on her wall, and hang a few shelves.....then I think her actual room will be done! Closet is a different story....we want to add some shelves along the bottom edge for toys & stuff.
 
I personally can't wait to see what else I have up my sleeve to get more projects done in the house!
 
 
Does Spring put you in the mood to be more crafty? What projects have you been working on?
 

Thursday, February 21, 2013

you.can't.take.me.out

So yesterday I was almost taken out twice....

On the way home from work I was coming up an exit ramp and an 18-wheeler was coming over towards me and continued too after me honking multiple times, there was no where for me to go because the ramp comes onto a bridge. So I was getting closed in between a bridge railing and this truck with no where to go...

Next thing that happened was later that night. Jonathan and I were on the way home and a car was sitting at a stop sign off of a highway we were going down. As we were passing them they suddenly decided to start moving out into the road, Jonathan had to swerve (luckily no one coming the other direction) so they wouldn't t-bone us on my side of the car.

The devil was trying to take me out for some reason, I got something on me he does't like. But by God's power, grace and mercy I've been kept safe and will still be here to do his will on earth. Take that devil; you've got nothing on my God. You've got nothing on the army of angels here on earth protecting my Father's people. You can try numerous things to bring harm against me or any one of God's children, but will never prevail. You lost long ago, so leave me alone because you can't take me out!

Psalm 91
Psalm 34:19-20

God constantly protects those who acknowledge him and love him!

Monday, December 24, 2012

holiday.goodies

The Christmas holiday is right around the corner and many are traveling to see loved ones, as my husband is. But I'm left at home because it's my year to work the Christmas holiday. So the ones of us who will be working & delivering little miracles into the world have decided to have a Christmas celebration of our own. Everyone will be bring some kind of dish, appetizer or sweets and an ornament to exchange with a coworker. I signed up to bring a cheeseball, but I wanted to do something extra too... [see receipes below]

Cranberry & Cheddar Cheeseball
{adopted from Martha Stewarts cheeseball receipes}

8 oz block of cream cheese
8 oz shredded cheddard cheese
2 tbsp peach chutney
1 1/2 tbsp softened margarine
4 dashes of tabasco sauce
1/2 tsp worcestershire sauce
2 tsp lemon juice
1/4 tsp black pepper
few dashes of salt
1 cup dried cranberries chopped

Mix all above ingredients except cranberries in a medium size mixing bowl. Be sure all ingredients are well blended. If mixture is to soft at this point, let it stand in the refrigerator for an hour. Then roll into ball like form. Roll cheese ball in a bowl full of chopped dried cranberries to form a layer on outer surface of ball. Or be creative and make your cheeseball into something festive using the dried cranberries as decor.

Here's my ornament cheeseball:

 { funny story: my husband thought this was a real ornament when i sent him the picture & he came home looking for it on the tree! }
 
 
Chocolate Peppermint Pretzels

12oz bag of Hersheys Special Dark chocolate morsels (or any you prefer)
5 large candy canes crushed
your preference of pretzels (i like the mini ties)

Add 6 oz of chocolate morsels to a microwavable bowl. Microwave on 60% power for 30 second increments. Each time stir and add an ounce more of morsels. Do this until all morsels have been used and chocolate is smooth. Dip half of pretzel in chocolate, tapping extra off. Then lay on parchment paper. After doing several take time to sprinkle crushed peppermint over chocolate side. Once all pretzels are complete move to refridgerator to harden. Takes about 30 minutes.

Then they're ready to serve! Mmmm!


Hope everyone has a Merry Christmas Eve & Merry Christmas!!

Wednesday, October 24, 2012

pumpkin.decorating

So I bought some pumpkins from Michael's about a month or so ago to have for carving or decorating. Since that time, they have just been sitting around, plain jane, just like they came out of the store [minus the tags or course]. Tonight I finally had time & was motivated to get my ideas on my pumpkins before it was to late and Halloween had passed.

Here's a small tutorial on how to decorate your pumpkins and picture of my final product!


Chevron Pumpkin & Initial 'P' Pumpkin
Things you'll need:
- pumpkin (store bought or real)
- tape (painters tape preferrable - won't take off paint of store bought pumpkins)
- idea / inspirations
- electric drill
- tape measure (optional)
- sharpie (optional)
- newspaper (or something to cover your work area)


1) mark off your design with your tape
 
 
2) get your drill ready


3) start drilling along your marked tape..... I had measured & marked a dot about 1 inch apart so I knew where to drill along the way


4) and this is what your pumpkin should look like after drilling. some tape may spin off with drill. (notice big mess I made to the side....this is why you should cover your work area with something)


5) next you'll want to drill a bigger hole in the back so you can add some life & light to your pumpkin. I did so by drilling a bunch of little holes that eventually amounted to this...


And here's how my 'P' pumpkin with swirls came out...


Eek! Pumpkin
Things you'll need:
- pumpkin (store bought or real)
- paint (your choice)
- Tacky glue
- various sized craft 'wiggle' eyes
- something to cover your work area
 
 
1) start out with your pumpkin. I chose my black store bought pumpkin for this project.


2) start attaching your 'wiggle' eyes to your pumpkin with tacky glue. be sure to place them randomly around the pumpkin.


3) before I had covered the pumpkin with my 'wiggle' eyes, I added in my Eek! art. I used a white/ silver glitter glue combination I made first. then to speed up the drying process, I used my hair dryer on low setting.


4) after the first layer of paint was completely dry, I added a second layer of orange. doing this makes the top layer pop!


And the final product....!


I have to say the Eek! pumpkin is my favorite so far! But we will see once they're all lit up and with the rest of the decorations on the front porch!

Hope you enjoyed.
Do you decorate for Halloween? If so, do you go all out, or do just a few things?
Have you tried any new pumpkin decorations this year?


-Liz

Friday, July 13, 2012

diy.roman.shades

So after moving into our new house we realized we had no shades.... I swear there were some hung when we viewed the house, but they were no longer residing in our house once it was ours. Now having lived here for a little over a month, it's come to the point that we NEED shades. I'm not allowing the pictures sitting on the window sills to cut it anymore. So I did my surfing on the web & perusing of pinterest to find some ideas on what to do for window treatments. I like blinds, but I like white wood blinds, and we have wood stained trim throughout the house....white & stain....don't combine for window treatment. And I was truly leaning toward the roman shade look. I found several tutorials on roman shades, some easy, some slightly difficult, some difficult to understand instructions, and others I just didn't want to put in all the effort because of my lack of time anyway. So since I had difficulty understanding some of these diy tutorials, I've decided to make my own. I hope the instructions are easy to understand. If you have any questions please feel free to ask.


:: DIY Blinds into Roman Shades ::


Things you'll need:
 - set of blinds
 - fabric of choice
 - fabric-tac glue
 - scissors
 - something heavy
 - iron
 - space
 - & a little bit of time


1. You'll need to measure the length & width of your window. At this step you must decide if you want the shade to hang inside the window frame or on the window frame.


2. Go buy you some blinds. If you can find cheap ones that will work for your window, great! Target has like $4 blinds, and you can pay about the same from some of the dollar stores. Due to the type of windows I had, and the fact I wanted my shades to hang inside the window frame I had to get blinds that hung in a unique fashion....and I will say, if ever I hang blinds or do this tutorial again in another house, these will definitely be the blinds I purchase. I got them from Kmart...Bali Window Solutions.

3. Next pick out some fabric that you like. When purchasing your fabric remember to accomodate for roughly 3 inches extra on each side. [so if your window is 23" x 64", then you would want your fabric to be about 29" x 70"]

4. Release your blinds so they hang as far down as the string allows. Then lay flat on the floor.


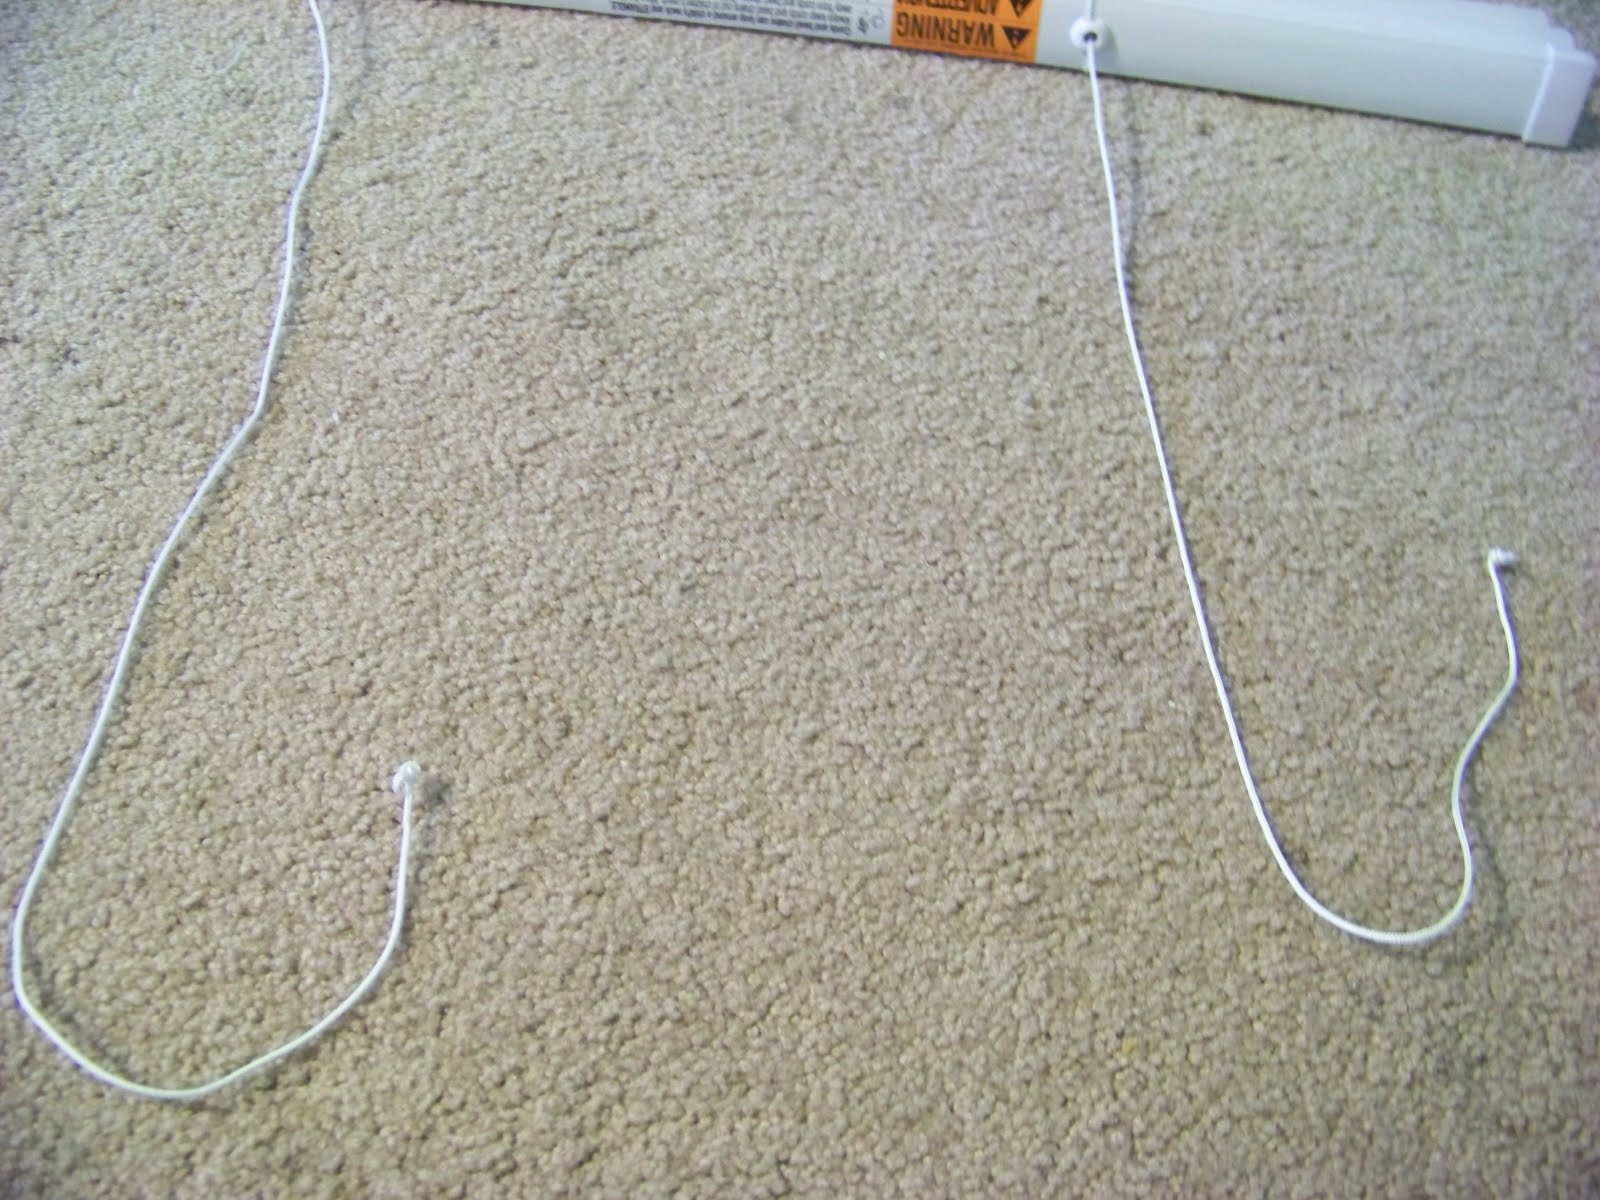
5. Now you will want to cut off the strings {outer strings} that hold the blinds in place. Usually there are two sets, unless your blinds are wider, then you may have three. It's easy if you snip from top, lift the top string & continue to cut the mini strings between the blinds from top to bottom. {Be careful no to cut the thicker string that runs through the middle of all the blinds....you cut this...you buy another set of blinds}


6. Deciding point & Using mathematics :: how far apart do you want your folds. Typically they are 6-9". I personally don't see why you can't go up to 12", especially on longer windows. I went with 9". Divide your total inches by wanted fold inches to determine the number of blinds you'll need to keep.

7. Now at this step you have 2 options::

   a) Proceed with cutting off all the individual blinds you do not want to keep.
{Reminder: avoid cutting the thick string through the middle of the blinds}


b) Find the knots at the bottom of the blind. Undo. Remove bottom bar & remove all the blinds you do not need. Then you will need to replace the bottom bar & re-tie the knots.


{ personal preference:: I like option A. because tying those knots back at the exact measurement on both sides is stupid hard & took up too much of my time ..yes I have tried both options--if your windows are shorter than the standard window length, your best option is B....otherwise always choose A & be careful around those middle strings }

[side note: if you go with option B, once you have re-tied the knots, be sure to melt the ends of the string to prevent unraveling]


8. Now your blinds should look something like this.

((please ignore ugly red stain))

9. Cut your fabric to size. Remember to alot about 3 inches extra on each side.


10. Lay your blinds face down on the backside of your fabric. Be sure the curved part of the blind is laying on the fabric.


11. Now you need to spread your blinds apart & measure equal distances between each piece. Since I decided on 9", I kept 6 individual blinds for a 64" shade. Be sure when measuring, to line up the ends of your blinds with a measuring tape on both ends....you  don't want crooked shades.


12. Place a large, flat dot of fabric-tac glue on each end of the blinds, and on top & bottom. Then fold over edges so they are tight against the edge of the blind.


13. Place something heavy over glued areas. This will ensure your fabric will adhere to the top & bottom curves of the blind. { I used my hand weights }


14. Glue down the bottom bar next. Be sure when you glue this down, you glue it as it would hang normally. So the front edge of the bar needs to be glued first, then the edges.

bottom & back edge

placing glue along the front edge

15. To cover the bottom & back edge, I made folds like I was wrapping a present & thoroughly glued down.


16. Glue the front edge of the top bar down to the fabric. Fold & glue fabric across the top as well (optional). The hardware to hang my shades would not allow for me to complete the last part of this step, but for most blind sets you should be able too. Also, be sure not to glue down your pull strings...keep them out of the way.


17. Once everything is dry, iron your edges. This allows for easier folding when you raise the shades.


18. Hang your shades as your directions instruct you.

19. Enjoy your beautiful new 'roman shades'!


I love mine!


Here is one I did with the fabric completely covering both sides of the shade. It turned out looking great, but I do not suggest doing this. It has made the shade too heavy & is difficult to get the shade to stay up due to the weight. The only way it may work is if you use a very lightweight fabric.